
Adobe Contribute Tutorial
The Division of Student Affairs has agreed to provide one license of Adobe Contribute to each of its programs. If additional licenses are needed, an additional charge will be billed to the program. Written authorization from department management must be submitted to the Student Services webmaster at sswebmaster@csulb.edu upon request of additional Contribute licenses.
Step 1: Establishing a Connection
A. Connect to Contribute Publishing Server
Contact the Student Services Division web master at sswebmaster@csulb.edu to be added to the list of Contribute connections to the Contribute Publishing Server.
To set up the connection, launch the Adobe Contribute program.
In the "Address" box, please delete everything and enter the address below:
connect:cps.aa.csulb.edu
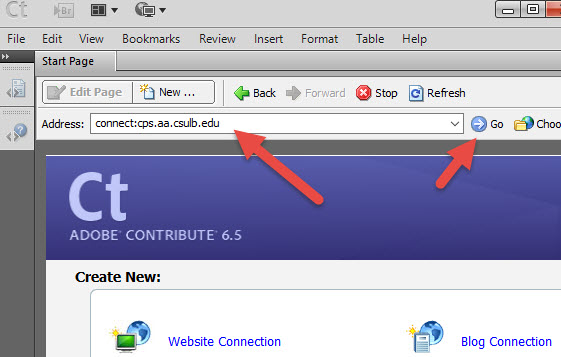
After that, please click on "Go" button or just hit "Enter"
When asked for a username and password, enter your Campus ID (ie: 001234567) for the username and your BeachID password (same as Beachboard/MyCSULB) for the password. If you are not sure what your password is, you can attempt to recover your password by following these instructions or contact the Technology Help Desk at (562) 985-4959.
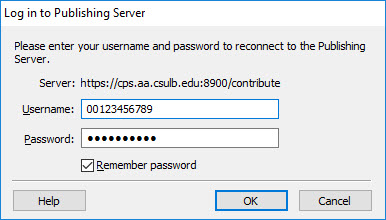
After you press OK, it will automatically validate and update your connections. Please wait for this to complete and you can finish this process.
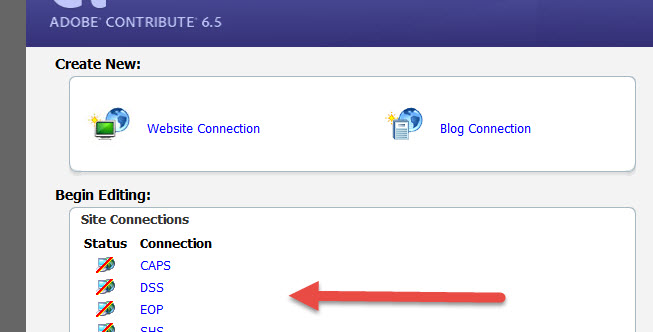
Once this is done, your connection(s) will be listed in the Connection list panel. You can click on one of your connections and start editing content.
You are now ready to begin editing your web site with Contribute.
B. Types of Roles in Adobe Contribute: Publishers vs. Writers
A new feature in Adobe Contribute is the ability to assign different connection types depending on user roles. A publisher role is assigned to a user who has rights to write web content and publish it to the web. A writer role is assigned to a user who only has rights to write web content; writer keys do not allow publishing to the web. Once a writer has drafted web content, he/she may send the content for review to a user with publishing rights.
Step 2: Editing a Web Page
Click on Edit Page on the toolbar (or go to Select File > Actions > Edit Page) to change to the Contribute browser to the Contribute editor.
You cannot edit a page if the page is locked--that is, if someone else is currently editing it. When you browse to a page, the message area under the toolbar indicates whether you can edit that page.
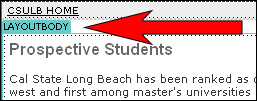
You may now edit anything within the "editable region," which is called LAYOUTBODY. Text changes and the addition of graphics may be made in the LAYOUTBODY. If changes outside of the LAYOUTBODY are needed, please contact the division webmaster at sswebmaster@csulb.edu.
A. Editing Text
The text toolbar at the top of the editor works very much like those in Microsoft Word or any other editor. You can italicize, bold or change the color of your text. Example: to make the text bold, highlight the text, then click on the "B" located on the toolbar.

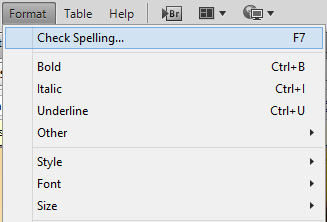
B. Check Spelling
Make it a common practice to check the spelling on all of your web pages. To check the spelling on a page click on Format > Check Spelling.
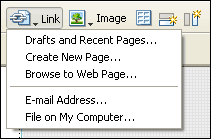
C. Creating Text and Image Links
In Adobe Contribute, you can make text or images in your web page act as links. When a visitor to your website clicks a link, specified text or an image, the browser takes the visitor to another web page or file, or starts their e-mail application.
To create a link, select the text or image that you would like to link and then click on one of the following option in the Link dropdown menu:
- Drafts and Recent Pages: A current draft or a recently published page on your website
- Create New Page: A new web page, which Contribute creates at the same time as the link
- Browse to Web page: An existing web page on your website or on another website
- E-mail Address: An e-mail address
- File on My Computer: An existing file on your computer, such as a Microsoft Word or PDF file
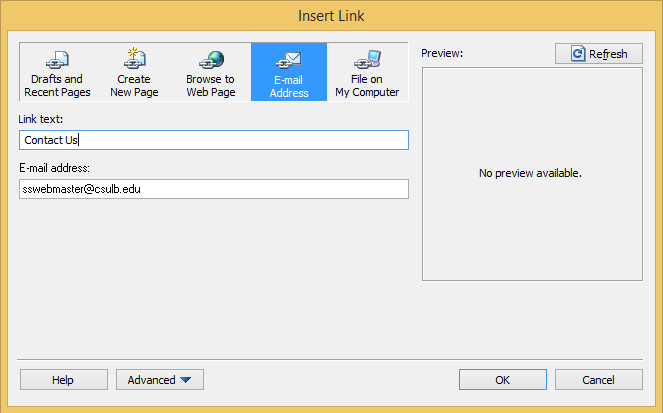
If you don’t know which option to select or change your mind during the process, the Insert Link dialogue box gives you the opportunity to change your mind. Notice when you select an option, the dialog box displays text boxes corresponding to each type of link.
D. Inserting Images and Photographs
At this time Contribute web content managers are unable to add images and photographs to websites. Contact the Student Affairs Division webmaster to request images and photographs or the deletion of images and photographs from your webpages.
E. Uploading Documents
1. Replace/Update Existing Document
Before upload a new version of a document, you will need to DELETE the current version of the document first. To do this, you need to get the address of the current version document on the web.
Open Adobe Contribute and connect to your site by clicking on "Connect" button on the top left screen if not yet (you are connected if you see the "Edit Page" button instead of "Connect".)
Browse to the page of the website where the document you want to delete is contained.
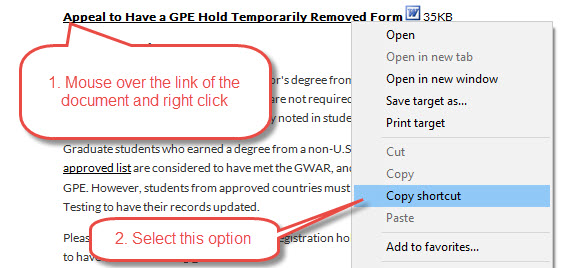
Mouse over the link of the document that you need to delete and right click mouse to select "Copy shortcut" from the options
Go back up to the Address bar and paste (Ctrl-V) the address of the document. The address of the document should end with .doc, .docx, or pdf.

Hit Enter to open up the document
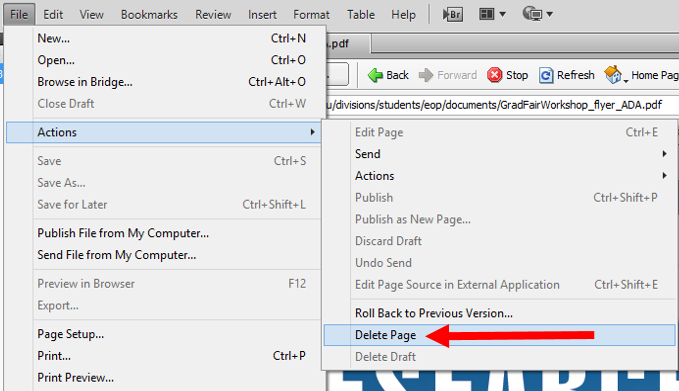
Go to the top left of the screen and select File > Actions > Delete Page.
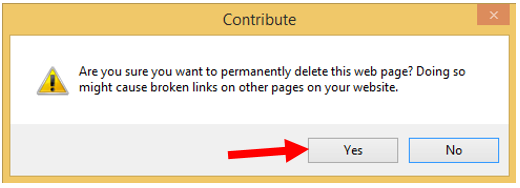
You will be presented with Delete File dialog. Click on "Yes".
The file is now deleted from the server.
To upload the new version of the document, follow the instructions in step 2 below.
2. Upload New Document
Open Adobe Contribute and connect to your site by clicking on "Connect" button on the top left screen if not yet (you are connected if you see the "Edit Page" button instead of "Connect".)
Enter edit mode by clicking on the "Edit Page" button
If this is a brand new document, type in the text/label of the document and highlight the whole text/label. If this is an existing label for the document, just highlight the whole text/label.
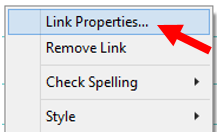
Right-click on the highlight text/label
Select "Link Properties...".
Select "File on My Computer...".
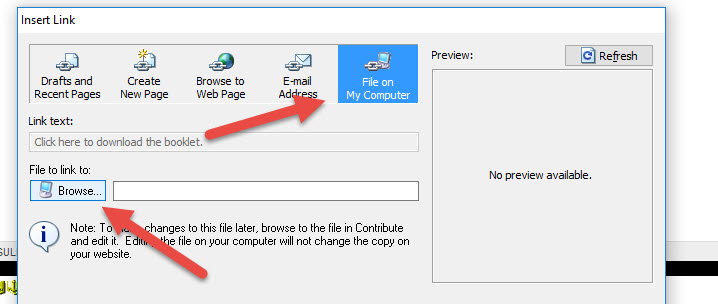
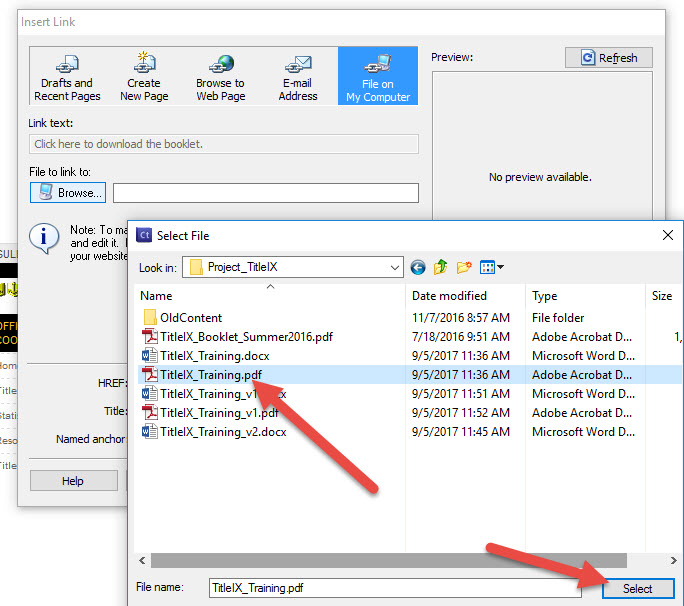
To select the file you wish to upload click on the "Browse" button. You will be presented with a "Select File" dialog where you can select the file from your local computer that you wish to upload. When the file is selected, click on "Select" button.
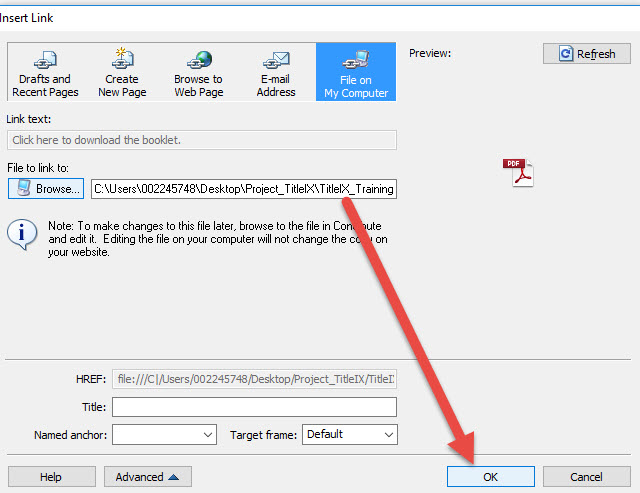
When done click "OK"
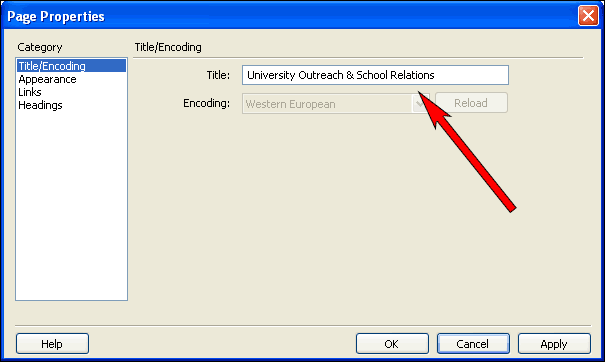
F. Changing the Title
The title of a web page appears in the top left corner of a browser.
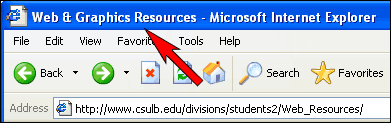
To change the title of a page click on "Page Properties" located at the top righthand corner of Adobe Contribute while in editing mode. Type in the new title in the title field.
G. Tables
Tables are containers that format the text and images in columns and rows.
At this time Contribute web content managers are unable to add tables to websites. Contact the Student Affairs Division webmaster to request tables or the deletion of tables from your webpages.
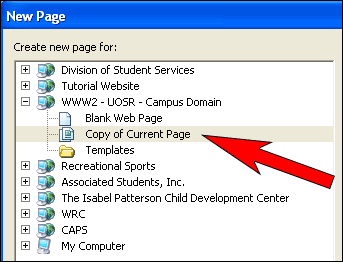
Step 3: Creating a New Page
Either select File > New Page or click the "Create New Page" button at the top of the Contribute document window.
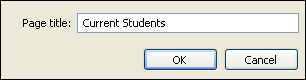
The option that is available to you for creating a new page is making a "Copy of Current Page," which allows you to make a quick copy of the formatted CSULB template currently used. Rename the current page and make your changes to the text and graphics. Now you have a new page that is consistent with the rest of the Division of Student Services Web site. You can add any number of pages in the same way, maintaining and creating pages quickly and easily. Do not use the second option, "Blank Web Page," which tells Contribute to make something totally different than the existing page and CSULB template.
Step 4: Publishing a Web Page
Contribute gives you two options to finish your work session. If you are not quite ready to show the world, you can select Save for Later. Just as the option implies, Contribute will save the work to your computer and close the page, but it won't upload the page to the remote Web site. That way, you can work on the page later.
If you’re ready to show the public users, however, select Publish. Since you are already connected to the Web site, in just a few seconds a message will appear: Congratulations! You've published your page on the Web site.
Adding Forms and Dynamic Content
Due to accessibility issues, web content managers are not able to use Adobe Contribute to edit or add forms and dynamic content If you would like to use forms or dynamic content on your site, please contact the division webmaster at sswebmaster@csulb.edu.
System Requirements for Adobe Contribute
The Division of Student Services will provide Adobe Contribute software for the Windows platform only. However, if a program chooses to purchase its own software for Mac, the specifications are also listed below.
Windows
- Intel® Pentium® 4 or AMD Athlon® 64 processor
- Microsoft® Windows® XP with Service Pack 3; or Windows 7
- Internet Explorer 7 or 8 or Firefox 12 or 13 required for the Adobe® Contribute® web browser plug-in
- 512MB of RAM
- 1GB of available hard-disk space for installation; additional free space required during installation (cannot install on removable flash storage devices)
Macintosh
- Multicore Intel processor
- Mac OS X v10.6 v10.7
- 512MB of RAM
- 1.4GB of available hard-disk space for installation; additional free space required during installation (cannot install on a volume that uses a case-sensitive file system or on removable flash storage devices)